> ## Documentation Index
> Fetch the complete documentation index at: https://docs.maximem.ai/llms.txt
> Use this file to discover all available pages before exploring further.
# Quickstart
> Install the SDK, create your first instance, ingest a memory, retrieve it. ~10 minutes.
**Where to start, depending on what you're trying to do**
* **"I just want to try Synap without installing anything"**: open the [live playground](https://synap.maximem.ai/playground) and exercise the SDK from your browser.
* **"I want to see Synap working in 10 minutes"**: you're on the right page. Stay here.
* **"I want to wire Synap into a real FastAPI / Flask / Next.js / Django app"**: head to [Setup & Integration](/setup/detailed-integration) after you finish this page.
* **"I want a complete end-to-end tutorial with an LLM, conversation routing, and graceful degradation"**: go to [First Integration](/setup/first-integration). That tutorial assumes you've finished this Quickstart.
* **"I use a framework (LangChain, LangGraph, Vercel AI SDK, CrewAI, LiveKit, Claude Agent SDK, Pipecat…)"**: you won't call most of these APIs directly. Skim this page for the mental model, then jump to [your integration](/integrations/overview).
**Using an AI coding agent?** Install the [Synap coding-agent skill](/integrations/ai-coding-agents) and just ask it to add Synap to your app: it knows the SDK and every framework integration. Works with Claude Code, Cursor, Codex, and more.
## The five identifiers, at a glance
Everything in Synap is scoped by these. You'll see them throughout this page:
| Identifier | What it is |
| ------------------------------------ | -------------------------------------------------------------------------------------------- |
| **Instance** | An agent you integrate with Maximem Synap (resolved from your API key, not passed per call). |
| **User** (`user_id`) | The end user of your agent (B2B or B2C). Passed on most calls. |
| **Customer** (`customer_id`) | (B2B only) one of your customer organizations. On B2C it is auto-resolved, so you omit it. |
| **Conversation** (`conversation_id`) | One chat thread. Must be a valid UUID. |
| **Client** | Your own organization account, which contains your instances. |
For the full model, see [Identifiers & Scopes](/concepts/memory-scopes).
## TL;DR: Hello World
If you already have an API key, this is everything you need to ingest one memory and read it back. This default is for a **B2C** app: one user (you), identified by `user_id` alone:
```python hello_synap.py theme={null}
# pip install maximem-synap
# export SYNAP_API_KEY=synap_...
import asyncio
from maximem_synap import MaximemSynapSDK
async def main():
sdk = MaximemSynapSDK()
await sdk.initialize()
try:
result = await sdk.memories.create(
document="User: I prefer dark mode.\nAssistant: Noted!",
document_type="ai-chat-conversation",
user_id="user_alice",
)
# Block until ingestion finishes (the honest pattern for scripts/tests).
await sdk.memories.wait_for_completion(result.ingestion_id)
# Retrieve via the scope you ingested at.
# B2C: customer_id is auto-resolved from user_id, so you can omit it.
context = await sdk.user.context.fetch(
user_id="user_alice",
search_query=["preferences"],
)
for p in context.preferences:
print(p.content)
finally:
await sdk.shutdown()
asyncio.run(main())
```
On a **B2B** instance, every user lives under a tenant, so each call also carries a `customer_id`. Pass it on both ingestion and retrieval:
```python theme={null}
await sdk.memories.create(
document="User: I prefer dark mode.\nAssistant: Noted!",
document_type="ai-chat-conversation",
user_id="user_alice",
customer_id="acme_corp",
)
# B2B: user scope requires BOTH user_id and customer_id.
context = await sdk.user.context.fetch(
user_id="user_alice",
customer_id="acme_corp",
search_query=["preferences"],
)
```
See [B2C vs B2B](#b2c-vs-b2b-which-one-are-you) below to tell which kind of instance you have.
The rest of this page unfolds those few lines into a step-by-step walkthrough. Read it if this is your first time. Skip ahead to [First Integration](/setup/first-integration) for the full agent loop with an LLM.
## B2C vs B2B: which one are you?
Synap supports two tenancy shapes, and your [Instance](/concepts/memory-scopes#clients-and-instances) is set to exactly one of them via the **User Relationship** setting in the Dashboard (Instance Settings). This single choice decides whether `customer_id` is required on every call.
* **B2C (personal app)**: one tier of users, no tenant above them. You identify each user by `user_id` only. `customer_id` is auto-resolved server-side, so you never pass it. This is the right model when your agent's users are individuals (a companion app, a personal assistant, your first hobby agent, one user: you).
* **B2B (multi-tenant)**: your customers are organizations, each containing many users. Every user is scoped under a `customer_id`, so you pass **both** `user_id` and `customer_id` on every call. Memories tagged at customer [scope](/concepts/memory-scopes) are shared across that tenant's users; user-scoped memories stay private to the user.
**How to tell which you have:** open your Instance in the Dashboard and check **User Relationship** under Instance Settings. If it's a personal/B2C relationship, omit `customer_id` (the examples in the main flow below). If it's a B2B relationship, add `customer_id` to every call (the B2B accordions). When in doubt, the default for a brand-new personal agent is B2C.
This page's main walkthrough uses the **B2C** shape. Each step includes a B2B accordion showing the extra `customer_id`.
***
## Prerequisites
* Python 3.11 or later
* A Synap account ([sign up at synap.maximem.ai](https://synap.maximem.ai))
* `pip` or `poetry` for package management
A [**Client**](/concepts/memory-scopes#clients-and-instances) is your organization's top-level account in Synap. Every instance belongs to a Client. You have two options:
**Create a new Client**
1. Log in to the [Synap Dashboard](https://synap.maximem.ai)
2. Click **Create Client**, enter your organization name, and confirm
**Join an existing Client**
If your team already has a Synap account, ask your administrator to invite you. Once added, log in and you'll see the shared Client and its instances in your Dashboard.
Skipping this step is not possible: every instance must belong to a Client. If you are unsure whether your organization already has one, check with your team before creating a new Client.
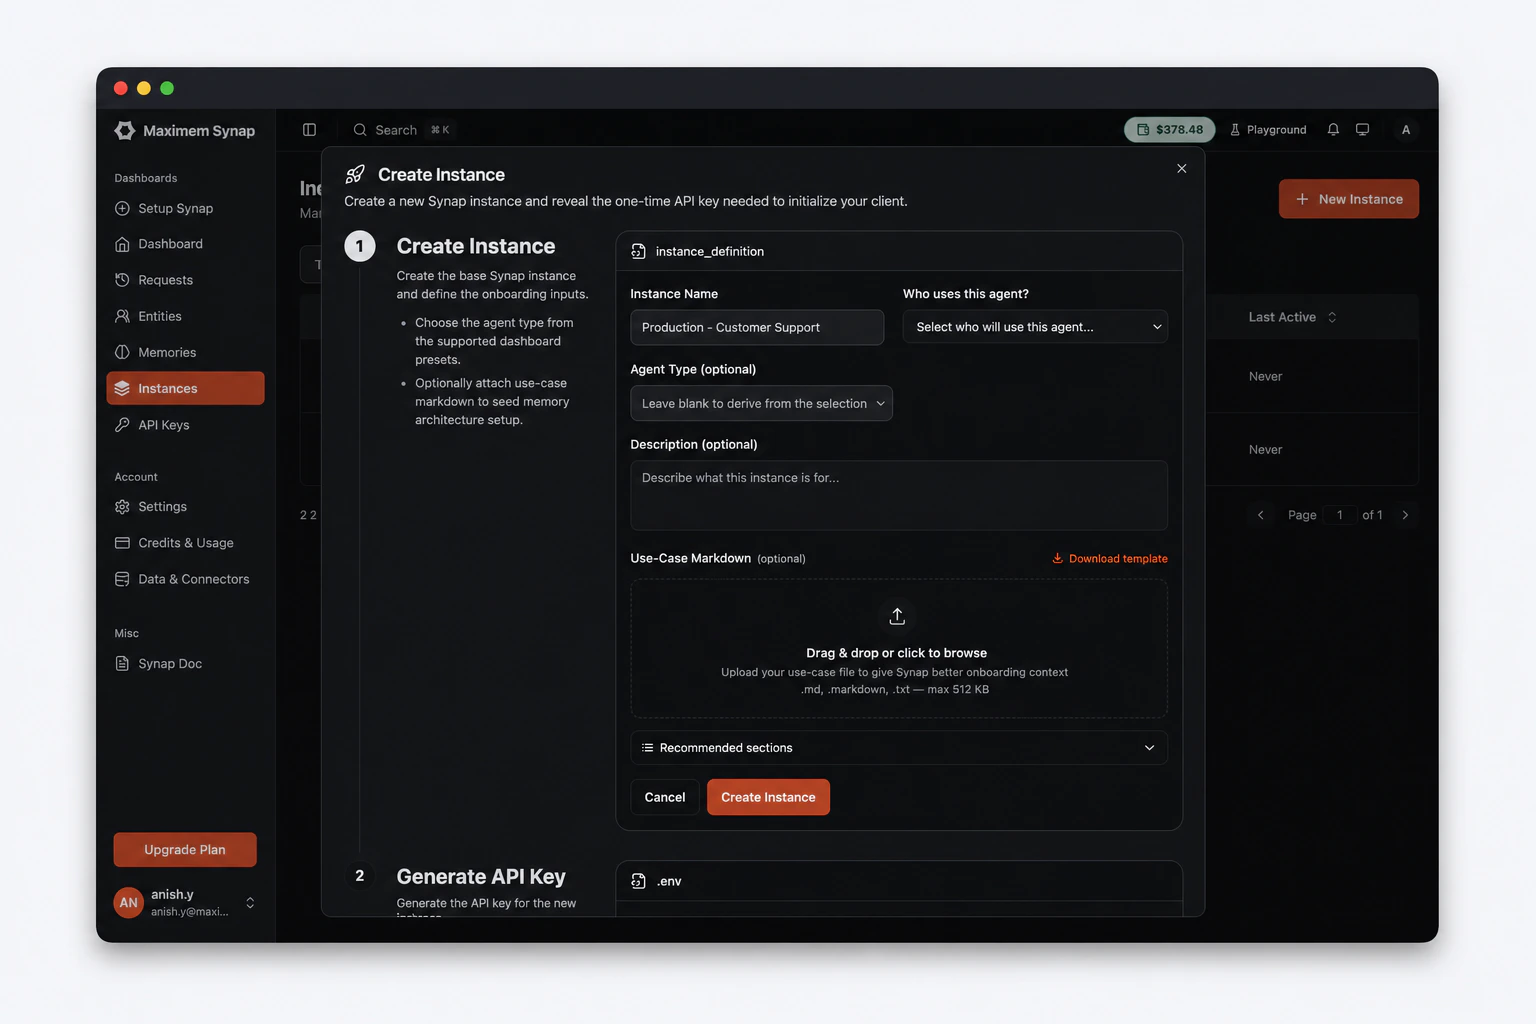
An instance is an isolated memory environment for your agent. Each instance has its own storage, configuration, and scope hierarchy.
1. In the Dashboard, navigate to **Instances** in the sidebar
2. Click **Create Instance**
3. Fill in the instance form:
* **Name** (required): A human-readable label, e.g. `"My First Agent"`
* **Agent Type** (optional): The kind of agent you're building (e.g. `B2B Customer Support`, `B2C Companion`, `Workflow Agent`). It seeds a sensible starting memory configuration for that use case. Skip it and Synap applies a default; you shape memory more precisely with the Use-Case Markdown file below, which you can update any time.
* **Description** (optional): A short description of what this instance is for
* **Use-Case Markdown** (optional but recommended): Upload a `.md` file describing your agent's use case (see below)
 ### Use-Case Markdown
The Use-Case Markdown file tells Synap what your agent does, who it serves, and what it should remember. Synap uses it to generate an optimized **Memory Architecture Configuration (MACA)** for your instance, so the more detail you provide, the better your memory extraction and retrieval will be from day one.
Click **Download Template** in the Create Instance form, fill in at least the three required sections (Agent Objective, Target Users, Task Examples), and upload the file (`.md`, `.markdown`, or `.txt`, max 512 KB) before clicking **Create**.
For the full template and section-by-section guidance, see [Writing a Use-Case Markdown File](/concepts/memory-architecture#the-use-case-file).
You can upload or update the use-case file at any time after instance creation via **Instance Settings** in the Dashboard. Synap will re-evaluate and update the MACA when a new file is submitted.
1. In the Dashboard, go to your newly created instance
2. Open the **API Keys** section on the instance detail page
3. Click **Generate API Key**
4. Give it a label (e.g., "development") and click **Generate**
5. Copy the key immediately: it starts with `synap_`
The API key is displayed only once. Copy it now and store it securely. If you lose it, revoke it from the dashboard and generate a new one.
Now that you have a key, install the Synap SDK from PyPI:
```bash pip theme={null}
pip install maximem-synap
```
```bash poetry theme={null}
poetry add maximem-synap
```
```bash uv theme={null}
uv add maximem-synap
# pip-compatible (existing venv): uv pip install maximem-synap
```
Streaming is enabled by default: no extra install needed.
Verify the installation:
```bash theme={null}
python -c "import maximem_synap; print(maximem_synap.__version__)"
```
Set your API key as an environment variable:
```bash Linux / macOS theme={null}
export SYNAP_API_KEY="synap_your_key_here"
```
```powershell Windows (PowerShell, session) theme={null}
$env:SYNAP_API_KEY = "synap_your_key_here"
```
```powershell Windows (PowerShell, persistent) theme={null}
[System.Environment]::SetEnvironmentVariable("SYNAP_API_KEY", "synap_your_key_here", "User")
```
```ini .env file (with python-dotenv) theme={null}
SYNAP_API_KEY=synap_your_key_here
```
Create a new Python file:
```python main.py theme={null}
import asyncio
from maximem_synap import MaximemSynapSDK
async def main():
sdk = MaximemSynapSDK()
await sdk.initialize()
print("Synap SDK initialized successfully!")
# Your code goes here...
await sdk.shutdown()
if __name__ == "__main__":
asyncio.run(main())
```
That's it. The SDK reads `SYNAP_API_KEY` from your environment automatically.
You can also pass the API key directly if you prefer:
```python theme={null}
sdk = MaximemSynapSDK(api_key="synap_your_key_here")
```
Run the script:
```bash Linux / macOS theme={null}
python main.py
```
```powershell Windows (PowerShell) theme={null}
py main.py
```
You should see `Synap SDK initialized successfully!`
On Windows, `python` is sometimes intercepted by the Microsoft Store app execution alias and fails with `"Python was not found"`. Use `py` (the Windows Python launcher) instead: it ships with every official Python installer. The same applies to `pip`: `py -m pip install maximem-synap` always works regardless of PATH configuration.
Now let's send a conversation to Synap. The ingestion pipeline will automatically extract structured knowledge: facts, preferences, entities, and more.
```python theme={null}
# Ingest a sample conversation (B2C: user_id only)
response = await sdk.memories.create(
document=(
"User: I'm in San Francisco, what's the weather like?\n"
"Assistant: It's sunny and 72°F in San Francisco today.\n"
"User: Nice! I love warm weather. I'm planning a trip to Japan next month.\n"
"Assistant: That sounds exciting! Japan in spring is beautiful."
),
document_type="ai-chat-conversation",
user_id="user_123",
)
print(f"Ingestion ID: {response.ingestion_id}")
print(f"Status: {response.status}")
```
On a B2B instance, add `customer_id` to scope this user under a tenant:
```python theme={null}
response = await sdk.memories.create(
document=(
"User: I'm in San Francisco, what's the weather like?\n"
"Assistant: It's sunny and 72°F in San Francisco today.\n"
"User: Nice! I love warm weather. I'm planning a trip to Japan next month.\n"
"Assistant: That sounds exciting! Japan in spring is beautiful."
),
document_type="ai-chat-conversation",
user_id="user_123",
customer_id="acme_corp",
)
```
The SDK returns immediately with an ingestion ID. The pipeline processes the content asynchronously, extracting:
* **Fact**: User is located in San Francisco
* **Preference**: User loves warm weather
* **Temporal event**: User is planning a trip to Japan next month
* **Entities**: San Francisco, Japan (resolved and linked in the knowledge graph)
Ingestion is asynchronous by design. The `memories.create()` call returns as soon as the content is accepted by Synap Cloud. Processing typically completes within a few seconds, but complex documents may take longer.
Once memories are ingested and processed, you can retrieve relevant context. Synap searches across both vector and graph storage, ranks results by relevance, and respects scope boundaries.
**Match the retrieval interface to the scope you ingested at.** Synap has three scope-specific retrieval methods, and a memory is only returned through the one that matches how it was tagged:
| If you ingested with… | Retrieve via… |
| -------------------------------------------------------------- | ----------------------------------------------------- |
| `user_id=...` (B2C) or `user_id=...` + `customer_id=...` (B2B) | `sdk.user.context.fetch(user_id=...)` |
| `customer_id=...` (no user) | `sdk.customer.context.fetch(customer_id=...)` |
| A conversation registered via `record_message(...)` | `sdk.conversation.context.fetch(conversation_id=...)` |
A memory tagged with multiple identifiers is retrievable through any matching interface. A conversation is registered only by `record_message(...)`; passing a `conversation_id` in `memories.create(metadata=...)` does **not** register it, because metadata is stored alongside the memory but is **not indexed for scope resolution**. Calling `conversation.context.fetch` with a brand-new, unregistered `conversation_id` returns empty results by design: there is no conversation row to anchor scope resolution. See [Context Fetch](/sdk/context-fetch) for the full reference.
**B2C vs B2B scoping.** On **B2C** instances there is no customer dimension, so `customer_id` is auto-resolved from `user_id` and you omit it; that's the example below. On **B2B** instances, memory is scoped to a `(user_id, customer_id)` pair, so when you fetch at user scope you must pass **both** identifiers; omitting `customer_id` raises an error.
The ingestion above used `user_id="user_123"`, so retrieve at user scope (B2C, `customer_id` is auto-resolved):
```python theme={null}
# Retrieve relevant context at user scope (matches the ingestion above).
# B2C: customer_id is auto-resolved from user_id, so omit it.
context = await sdk.user.context.fetch(
user_id="user_123",
search_query=["weather preferences", "travel plans"],
max_results=5,
)
# Print retrieved facts
print(f"Retrieved {len(context.facts)} facts:")
for fact in context.facts:
print(f" - {fact.content} (confidence: {fact.confidence})")
# Print retrieved preferences
print(f"\nRetrieved {len(context.preferences)} preferences:")
for pref in context.preferences:
print(f" - {pref.content}")
# Print retrieved episodes
print(f"\nRetrieved {len(context.episodes)} episodes:")
for episode in context.episodes:
print(f" - {episode.summary}")
```
On a B2B instance you ingested with `customer_id="acme_corp"`, so pass both identifiers at user scope:
```python theme={null}
context = await sdk.user.context.fetch(
user_id="user_123",
customer_id="acme_corp",
search_query=["weather preferences", "travel plans"],
max_results=5,
)
```
Example output:
```
Retrieved 1 facts:
- User is located in San Francisco (confidence: 0.92)
Retrieved 1 preferences:
- User loves warm weather
Retrieved 1 episodes:
- User is planning a trip to Japan next month
```
You can now inject this context into your LLM's system prompt or conversation history to create a personalized, context-aware experience.
Always shut down the SDK cleanly to flush any pending operations and release resources:
```python theme={null}
await sdk.shutdown()
```
The complete script looks like this:
```python main.py theme={null}
import asyncio
from maximem_synap import MaximemSynapSDK
async def main():
# Reads SYNAP_API_KEY from environment; instance ID resolved server-side
sdk = MaximemSynapSDK()
await sdk.initialize()
# Ingest a conversation (B2C: user_id only)
response = await sdk.memories.create(
document=(
"User: I'm in San Francisco, what's the weather like?\n"
"Assistant: It's sunny and 72°F in San Francisco today.\n"
"User: Nice! I love warm weather. I'm planning a trip to Japan next month.\n"
"Assistant: That sounds exciting! Japan in spring is beautiful."
),
document_type="ai-chat-conversation",
user_id="user_123",
)
print(f"Ingested: {response.ingestion_id}")
# Block until ingestion completes, instead of guessing with a fixed sleep.
await sdk.memories.wait_for_completion(response.ingestion_id)
# Retrieve context at the same scope used for ingestion (user).
# B2C: customer_id is auto-resolved from user_id, so omit it.
# (On a B2B instance, pass both user_id and customer_id here.)
context = await sdk.user.context.fetch(
user_id="user_123",
search_query=["weather preferences"],
max_results=5,
)
for fact in context.facts:
print(f" {fact.content} (confidence: {fact.confidence})")
await sdk.shutdown()
if __name__ == "__main__":
asyncio.run(main())
```
A real agent doesn't ingest in isolation. It **fetches relevant context, calls the LLM with that context, and ingests the resulting turn back into memory**. That is the atomic unit of using Synap. Here's the minimum-viable version with OpenAI (B2C, `user_id` only):
`conversation_id` must be a valid UUID: the server rejects non-UUID strings. Generate one per chat thread with `uuid.uuid4()` and reuse it across that thread's turns.
```python theme={null}
import uuid
from maximem_synap import MaximemSynapSDK
from openai import AsyncOpenAI
sdk = MaximemSynapSDK()
openai = AsyncOpenAI()
# One UUID per chat thread, reused across its turns.
conversation_id = str(uuid.uuid4())
async def turn(user_id: str, conversation_id: str, user_message: str) -> str:
# 1. Record the user's message. record_message is what REGISTERS the
# conversation, creating the row that conversation.context.fetch needs
# to resolve scope on subsequent turns. (Passing conversation_id only
# as memories.create metadata would NOT register it; metadata is
# stored but not indexed for scope resolution.)
await sdk.conversation.record_message(
conversation_id=conversation_id,
role="user",
content=user_message,
user_id=user_id,
)
# 2. Retrieve relevant memory context for this conversation
ctx = await sdk.conversation.context.fetch(
conversation_id=conversation_id,
user_id=user_id,
search_query=[user_message],
)
memories = "\n".join(f"- {f.content}" for f in ctx.facts[:5])
# 3. Generate with the LLM, injecting memories into the system prompt
completion = await openai.chat.completions.create(
model="gpt-4o",
messages=[
{"role": "system", "content": f"Known facts about the user:\n{memories}"},
{"role": "user", "content": user_message},
],
)
reply = completion.choices[0].message.content
# 4. Record the assistant reply, then persist the turn for long-term retrieval
await sdk.conversation.record_message(
conversation_id=conversation_id,
role="assistant",
content=reply,
user_id=user_id,
)
await sdk.memories.create(
document=f"User: {user_message}\nAssistant: {reply}",
document_type="ai-chat-conversation",
user_id=user_id,
metadata={"conversation_id": conversation_id},
)
return reply
```
The `metadata={"conversation_id": ...}` on `memories.create` is for your own bookkeeping: it travels with the memory but is **not indexed**, so it does not register the conversation or affect scope resolution. The conversation is registered solely by `record_message(...)` in step 1.
On a B2B instance, thread `customer_id` through every call alongside `user_id`:
```python theme={null}
async def turn(user_id: str, customer_id: str, conversation_id: str, user_message: str) -> str:
await sdk.conversation.record_message(
conversation_id=conversation_id, role="user", content=user_message,
user_id=user_id, customer_id=customer_id,
)
ctx = await sdk.conversation.context.fetch(
conversation_id=conversation_id, user_id=user_id, customer_id=customer_id,
search_query=[user_message],
)
# ... generate reply ...
await sdk.conversation.record_message(
conversation_id=conversation_id, role="assistant", content=reply,
user_id=user_id, customer_id=customer_id,
)
await sdk.memories.create(
document=f"User: {user_message}\nAssistant: {reply}",
document_type="ai-chat-conversation",
user_id=user_id, customer_id=customer_id,
metadata={"conversation_id": conversation_id},
)
```
For a fully-worked FastAPI + OpenAI app (including error handling, graceful degradation, and conversation routing), continue to the [First Integration](/setup/first-integration) guide.
## What's next?
You've successfully ingested your first memory and retrieved context. Here's where to go from here:
Understand the full Synap architecture: scopes, memory types, entity resolution, and the ingestion pipeline.
Configure the SDK for your production environment: timeouts, retries, logging, and credential management.
Learn how to configure what gets extracted, how it's stored, and how retrieval ranking works.
Security, performance, monitoring, and reliability best practices before going live.
### Use-Case Markdown
The Use-Case Markdown file tells Synap what your agent does, who it serves, and what it should remember. Synap uses it to generate an optimized **Memory Architecture Configuration (MACA)** for your instance, so the more detail you provide, the better your memory extraction and retrieval will be from day one.
Click **Download Template** in the Create Instance form, fill in at least the three required sections (Agent Objective, Target Users, Task Examples), and upload the file (`.md`, `.markdown`, or `.txt`, max 512 KB) before clicking **Create**.
For the full template and section-by-section guidance, see [Writing a Use-Case Markdown File](/concepts/memory-architecture#the-use-case-file).
You can upload or update the use-case file at any time after instance creation via **Instance Settings** in the Dashboard. Synap will re-evaluate and update the MACA when a new file is submitted.
1. In the Dashboard, go to your newly created instance
2. Open the **API Keys** section on the instance detail page
3. Click **Generate API Key**
4. Give it a label (e.g., "development") and click **Generate**
5. Copy the key immediately: it starts with `synap_`
The API key is displayed only once. Copy it now and store it securely. If you lose it, revoke it from the dashboard and generate a new one.
Now that you have a key, install the Synap SDK from PyPI:
```bash pip theme={null}
pip install maximem-synap
```
```bash poetry theme={null}
poetry add maximem-synap
```
```bash uv theme={null}
uv add maximem-synap
# pip-compatible (existing venv): uv pip install maximem-synap
```
Streaming is enabled by default: no extra install needed.
Verify the installation:
```bash theme={null}
python -c "import maximem_synap; print(maximem_synap.__version__)"
```
Set your API key as an environment variable:
```bash Linux / macOS theme={null}
export SYNAP_API_KEY="synap_your_key_here"
```
```powershell Windows (PowerShell, session) theme={null}
$env:SYNAP_API_KEY = "synap_your_key_here"
```
```powershell Windows (PowerShell, persistent) theme={null}
[System.Environment]::SetEnvironmentVariable("SYNAP_API_KEY", "synap_your_key_here", "User")
```
```ini .env file (with python-dotenv) theme={null}
SYNAP_API_KEY=synap_your_key_here
```
Create a new Python file:
```python main.py theme={null}
import asyncio
from maximem_synap import MaximemSynapSDK
async def main():
sdk = MaximemSynapSDK()
await sdk.initialize()
print("Synap SDK initialized successfully!")
# Your code goes here...
await sdk.shutdown()
if __name__ == "__main__":
asyncio.run(main())
```
That's it. The SDK reads `SYNAP_API_KEY` from your environment automatically.
You can also pass the API key directly if you prefer:
```python theme={null}
sdk = MaximemSynapSDK(api_key="synap_your_key_here")
```
Run the script:
```bash Linux / macOS theme={null}
python main.py
```
```powershell Windows (PowerShell) theme={null}
py main.py
```
You should see `Synap SDK initialized successfully!`
On Windows, `python` is sometimes intercepted by the Microsoft Store app execution alias and fails with `"Python was not found"`. Use `py` (the Windows Python launcher) instead: it ships with every official Python installer. The same applies to `pip`: `py -m pip install maximem-synap` always works regardless of PATH configuration.
Now let's send a conversation to Synap. The ingestion pipeline will automatically extract structured knowledge: facts, preferences, entities, and more.
```python theme={null}
# Ingest a sample conversation (B2C: user_id only)
response = await sdk.memories.create(
document=(
"User: I'm in San Francisco, what's the weather like?\n"
"Assistant: It's sunny and 72°F in San Francisco today.\n"
"User: Nice! I love warm weather. I'm planning a trip to Japan next month.\n"
"Assistant: That sounds exciting! Japan in spring is beautiful."
),
document_type="ai-chat-conversation",
user_id="user_123",
)
print(f"Ingestion ID: {response.ingestion_id}")
print(f"Status: {response.status}")
```
On a B2B instance, add `customer_id` to scope this user under a tenant:
```python theme={null}
response = await sdk.memories.create(
document=(
"User: I'm in San Francisco, what's the weather like?\n"
"Assistant: It's sunny and 72°F in San Francisco today.\n"
"User: Nice! I love warm weather. I'm planning a trip to Japan next month.\n"
"Assistant: That sounds exciting! Japan in spring is beautiful."
),
document_type="ai-chat-conversation",
user_id="user_123",
customer_id="acme_corp",
)
```
The SDK returns immediately with an ingestion ID. The pipeline processes the content asynchronously, extracting:
* **Fact**: User is located in San Francisco
* **Preference**: User loves warm weather
* **Temporal event**: User is planning a trip to Japan next month
* **Entities**: San Francisco, Japan (resolved and linked in the knowledge graph)
Ingestion is asynchronous by design. The `memories.create()` call returns as soon as the content is accepted by Synap Cloud. Processing typically completes within a few seconds, but complex documents may take longer.
Once memories are ingested and processed, you can retrieve relevant context. Synap searches across both vector and graph storage, ranks results by relevance, and respects scope boundaries.
**Match the retrieval interface to the scope you ingested at.** Synap has three scope-specific retrieval methods, and a memory is only returned through the one that matches how it was tagged:
| If you ingested with… | Retrieve via… |
| -------------------------------------------------------------- | ----------------------------------------------------- |
| `user_id=...` (B2C) or `user_id=...` + `customer_id=...` (B2B) | `sdk.user.context.fetch(user_id=...)` |
| `customer_id=...` (no user) | `sdk.customer.context.fetch(customer_id=...)` |
| A conversation registered via `record_message(...)` | `sdk.conversation.context.fetch(conversation_id=...)` |
A memory tagged with multiple identifiers is retrievable through any matching interface. A conversation is registered only by `record_message(...)`; passing a `conversation_id` in `memories.create(metadata=...)` does **not** register it, because metadata is stored alongside the memory but is **not indexed for scope resolution**. Calling `conversation.context.fetch` with a brand-new, unregistered `conversation_id` returns empty results by design: there is no conversation row to anchor scope resolution. See [Context Fetch](/sdk/context-fetch) for the full reference.
**B2C vs B2B scoping.** On **B2C** instances there is no customer dimension, so `customer_id` is auto-resolved from `user_id` and you omit it; that's the example below. On **B2B** instances, memory is scoped to a `(user_id, customer_id)` pair, so when you fetch at user scope you must pass **both** identifiers; omitting `customer_id` raises an error.
The ingestion above used `user_id="user_123"`, so retrieve at user scope (B2C, `customer_id` is auto-resolved):
```python theme={null}
# Retrieve relevant context at user scope (matches the ingestion above).
# B2C: customer_id is auto-resolved from user_id, so omit it.
context = await sdk.user.context.fetch(
user_id="user_123",
search_query=["weather preferences", "travel plans"],
max_results=5,
)
# Print retrieved facts
print(f"Retrieved {len(context.facts)} facts:")
for fact in context.facts:
print(f" - {fact.content} (confidence: {fact.confidence})")
# Print retrieved preferences
print(f"\nRetrieved {len(context.preferences)} preferences:")
for pref in context.preferences:
print(f" - {pref.content}")
# Print retrieved episodes
print(f"\nRetrieved {len(context.episodes)} episodes:")
for episode in context.episodes:
print(f" - {episode.summary}")
```
On a B2B instance you ingested with `customer_id="acme_corp"`, so pass both identifiers at user scope:
```python theme={null}
context = await sdk.user.context.fetch(
user_id="user_123",
customer_id="acme_corp",
search_query=["weather preferences", "travel plans"],
max_results=5,
)
```
Example output:
```
Retrieved 1 facts:
- User is located in San Francisco (confidence: 0.92)
Retrieved 1 preferences:
- User loves warm weather
Retrieved 1 episodes:
- User is planning a trip to Japan next month
```
You can now inject this context into your LLM's system prompt or conversation history to create a personalized, context-aware experience.
Always shut down the SDK cleanly to flush any pending operations and release resources:
```python theme={null}
await sdk.shutdown()
```
The complete script looks like this:
```python main.py theme={null}
import asyncio
from maximem_synap import MaximemSynapSDK
async def main():
# Reads SYNAP_API_KEY from environment; instance ID resolved server-side
sdk = MaximemSynapSDK()
await sdk.initialize()
# Ingest a conversation (B2C: user_id only)
response = await sdk.memories.create(
document=(
"User: I'm in San Francisco, what's the weather like?\n"
"Assistant: It's sunny and 72°F in San Francisco today.\n"
"User: Nice! I love warm weather. I'm planning a trip to Japan next month.\n"
"Assistant: That sounds exciting! Japan in spring is beautiful."
),
document_type="ai-chat-conversation",
user_id="user_123",
)
print(f"Ingested: {response.ingestion_id}")
# Block until ingestion completes, instead of guessing with a fixed sleep.
await sdk.memories.wait_for_completion(response.ingestion_id)
# Retrieve context at the same scope used for ingestion (user).
# B2C: customer_id is auto-resolved from user_id, so omit it.
# (On a B2B instance, pass both user_id and customer_id here.)
context = await sdk.user.context.fetch(
user_id="user_123",
search_query=["weather preferences"],
max_results=5,
)
for fact in context.facts:
print(f" {fact.content} (confidence: {fact.confidence})")
await sdk.shutdown()
if __name__ == "__main__":
asyncio.run(main())
```
A real agent doesn't ingest in isolation. It **fetches relevant context, calls the LLM with that context, and ingests the resulting turn back into memory**. That is the atomic unit of using Synap. Here's the minimum-viable version with OpenAI (B2C, `user_id` only):
`conversation_id` must be a valid UUID: the server rejects non-UUID strings. Generate one per chat thread with `uuid.uuid4()` and reuse it across that thread's turns.
```python theme={null}
import uuid
from maximem_synap import MaximemSynapSDK
from openai import AsyncOpenAI
sdk = MaximemSynapSDK()
openai = AsyncOpenAI()
# One UUID per chat thread, reused across its turns.
conversation_id = str(uuid.uuid4())
async def turn(user_id: str, conversation_id: str, user_message: str) -> str:
# 1. Record the user's message. record_message is what REGISTERS the
# conversation, creating the row that conversation.context.fetch needs
# to resolve scope on subsequent turns. (Passing conversation_id only
# as memories.create metadata would NOT register it; metadata is
# stored but not indexed for scope resolution.)
await sdk.conversation.record_message(
conversation_id=conversation_id,
role="user",
content=user_message,
user_id=user_id,
)
# 2. Retrieve relevant memory context for this conversation
ctx = await sdk.conversation.context.fetch(
conversation_id=conversation_id,
user_id=user_id,
search_query=[user_message],
)
memories = "\n".join(f"- {f.content}" for f in ctx.facts[:5])
# 3. Generate with the LLM, injecting memories into the system prompt
completion = await openai.chat.completions.create(
model="gpt-4o",
messages=[
{"role": "system", "content": f"Known facts about the user:\n{memories}"},
{"role": "user", "content": user_message},
],
)
reply = completion.choices[0].message.content
# 4. Record the assistant reply, then persist the turn for long-term retrieval
await sdk.conversation.record_message(
conversation_id=conversation_id,
role="assistant",
content=reply,
user_id=user_id,
)
await sdk.memories.create(
document=f"User: {user_message}\nAssistant: {reply}",
document_type="ai-chat-conversation",
user_id=user_id,
metadata={"conversation_id": conversation_id},
)
return reply
```
The `metadata={"conversation_id": ...}` on `memories.create` is for your own bookkeeping: it travels with the memory but is **not indexed**, so it does not register the conversation or affect scope resolution. The conversation is registered solely by `record_message(...)` in step 1.
On a B2B instance, thread `customer_id` through every call alongside `user_id`:
```python theme={null}
async def turn(user_id: str, customer_id: str, conversation_id: str, user_message: str) -> str:
await sdk.conversation.record_message(
conversation_id=conversation_id, role="user", content=user_message,
user_id=user_id, customer_id=customer_id,
)
ctx = await sdk.conversation.context.fetch(
conversation_id=conversation_id, user_id=user_id, customer_id=customer_id,
search_query=[user_message],
)
# ... generate reply ...
await sdk.conversation.record_message(
conversation_id=conversation_id, role="assistant", content=reply,
user_id=user_id, customer_id=customer_id,
)
await sdk.memories.create(
document=f"User: {user_message}\nAssistant: {reply}",
document_type="ai-chat-conversation",
user_id=user_id, customer_id=customer_id,
metadata={"conversation_id": conversation_id},
)
```
For a fully-worked FastAPI + OpenAI app (including error handling, graceful degradation, and conversation routing), continue to the [First Integration](/setup/first-integration) guide.
## What's next?
You've successfully ingested your first memory and retrieved context. Here's where to go from here:
Understand the full Synap architecture: scopes, memory types, entity resolution, and the ingestion pipeline.
Configure the SDK for your production environment: timeouts, retries, logging, and credential management.
Learn how to configure what gets extracted, how it's stored, and how retrieval ranking works.
Security, performance, monitoring, and reliability best practices before going live.