Every instance belongs to a client organization and is identified by a unique ID in the formatDocumentation Index
Fetch the complete documentation index at: https://docs.maximem.ai/llms.txt
Use this file to discover all available pages before exploring further.
inst_<hex16> (for example, inst_a1b2c3d4e5f67890).

Creating an instance
Owners and Admins can create new instances directly from the dashboard.Navigate to the Instances page
From the dashboard home, click Instances in the left sidebar. You will see a list of all existing instances for your organization.
Click Create Instance
Click the Create Instance button in the top-right corner. A creation form will appear.
Fill in the instance details
Provide the following information:
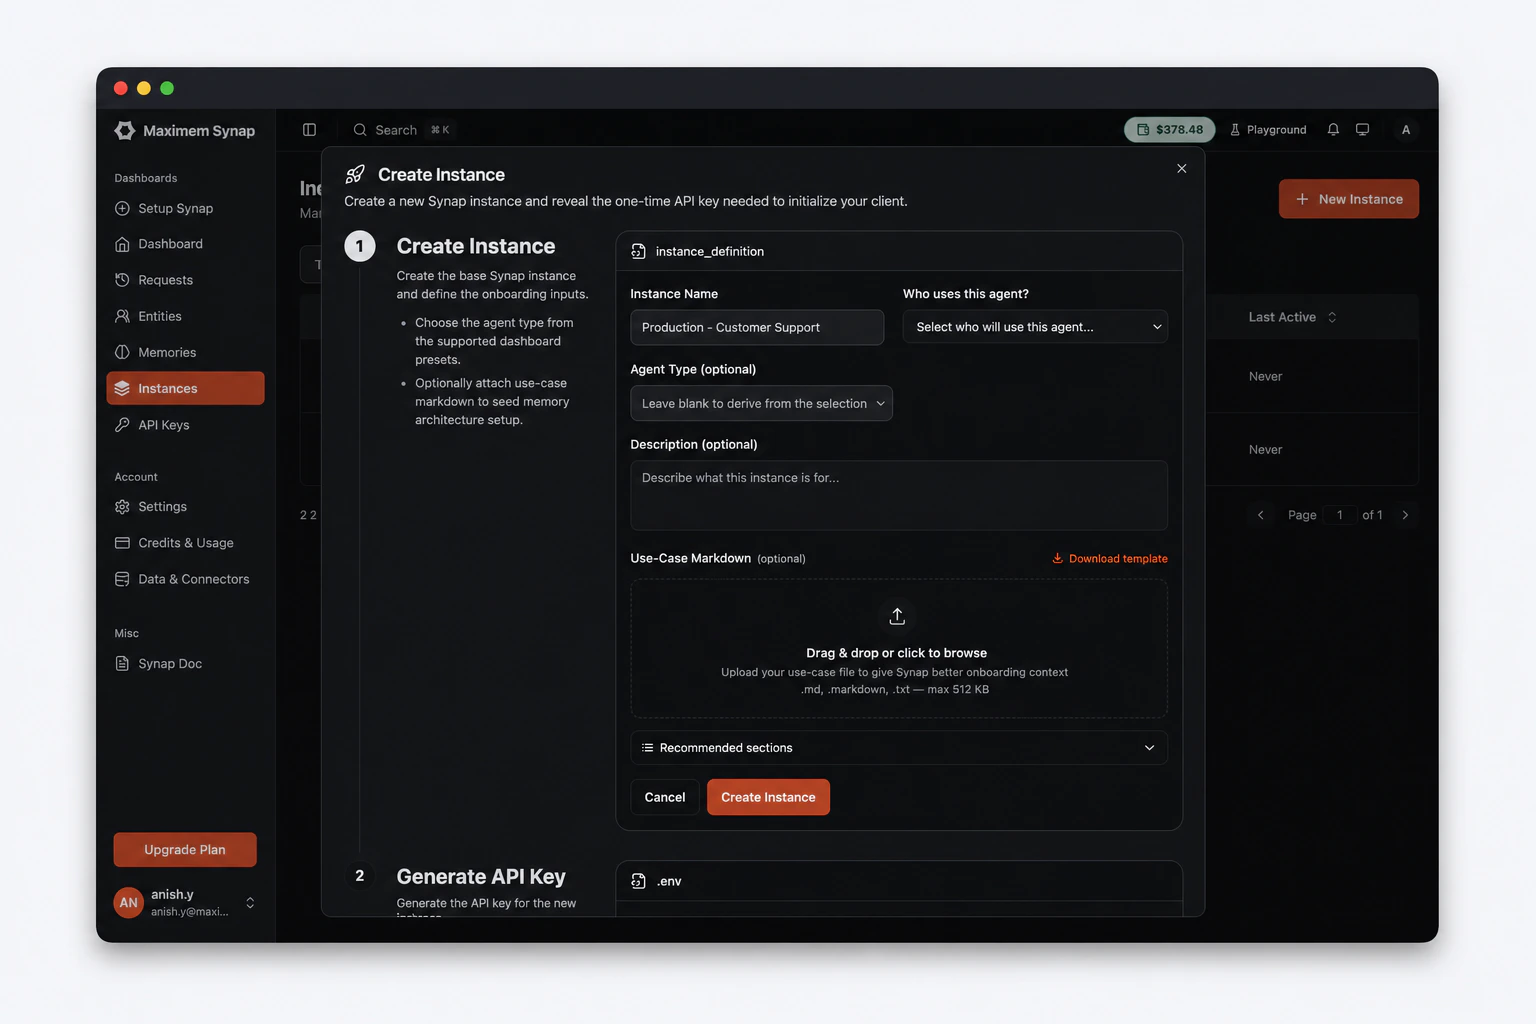
| Field | Required | Description |
|---|---|---|
| Name | Yes | A human-readable name for the instance (e.g., customer-support-prod, onboarding-assistant-staging) |
| Agent Type | Yes | The type of agent this instance serves (e.g., B2B Customer Support, B2C Companion, Workflow Agent) |
| Description | No | A brief description of the instance’s purpose |
| Use-Case Markdown | No (recommended) | A .md file describing your agent’s use case — used to generate the Memory Architecture Configuration (MACA) |
| Metadata | No | Key-value pairs for custom tagging and organization |
Use-Case Markdown
The Use-Case Markdown file is the primary input Synap uses to generate an optimized Memory Architecture Configuration (MACA) for your instance. It describes what your agent does, who it serves, and what it should prioritize remembering — giving Synap the context it needs to configure storage, extraction, and retrieval correctly from day one.Click Download Template in the form to get a pre-structured file, then fill in your details and upload it before clicking Create. Accepted formats:.md, .markdown, .txt — max 512 KB.The template contains eight sections:| Section | Required | Purpose |
|---|---|---|
| Agent Objective | Yes | What your agent does and the problem it solves |
| Target Users | Yes | Who interacts with the agent — roles, technical level, interaction patterns |
| Task Examples | Yes | 3–5 representative user messages and what the agent should do |
| Behavioral Guidelines | No | Do’s and don’ts — what the agent should always or never do |
| Role Descriptions | No | Clarifies who Client, Customer, and User are in your setup |
| Compliance & Data Sensitivity | No | Regulatory frameworks, PII handling, data retention constraints |
| Memory Priorities | No | What the agent should prioritize remembering vs. ignore |
| Additional Context | No | Business context, integrations, technical constraints |
Instance enters initializing status
After creation, the instance starts in the initializing status. Synap allocates storage namespaces, applies the initial Memory Architecture Configuration, and waits for the first SDK connection. The instance transitions to active once initialization completes.

Instance details
The instance detail page provides a comprehensive view of an individual instance. Clicking any instance in the list view opens its detail page.
| Section | Information |
|---|---|
| Status | Current instance status (active, inactive, suspended, initializing, deleting) |
| Agent Type | The configured agent type for this instance |
| Config Status | Status of the Memory Architecture Configuration (pending, approved, rejected, active) |
| API Calls (24h) | Total API requests processed in the last 24 hours |
| Memory Count | Total number of memories stored across all scopes |
| Created Date | When the instance was first created |
| Last Activity | Timestamp of the most recent SDK interaction |
Updating an instance
To update an instance’s metadata, navigate to its detail page and click Edit. You can modify:- Name — Rename the instance to better reflect its current purpose.
- Description — Update or add a description.
- Metadata — Add, modify, or remove custom key-value pairs.
Updating instance metadata does not affect running conversations or stored memories. These changes are purely organizational.
Instance statuses
Every instance has a status that reflects its current lifecycle state.Initializing
Initializing
The instance has been created and Synap is allocating storage namespaces and applying the initial Memory Architecture Configuration. Once initialization completes, the status transitions to active.What you can do: Generate API keys, review configuration, view the instance detail page.What you cannot do: The instance will not process ingestion or retrieval requests until it becomes active.
Active
Active
The instance is running and accepting requests. The SDK has successfully connected and the instance is processing ingestion, retrieval, and streaming operations.What you can do: Full functionality — ingest memories, retrieve context, update configuration, view analytics.
Inactive
Inactive
The instance has been paused. It retains all stored memories and configuration but does not accept new requests. You can reactivate an inactive instance at any time.What you can do: View stored data, update configuration, reactivate the instance.What you cannot do: The instance will reject ingestion and retrieval requests from the SDK.
Suspended
Suspended
The instance has been administratively suspended, typically due to policy violations or billing issues. Only Synap support or the organization Owner can lift a suspension.What you can do: View the instance detail page. Contact support for resolution.What you cannot do: All operations are blocked until the suspension is lifted.
Deleting
Deleting
The instance is being torn down. Memories, credentials, and storage namespaces are being purged asynchronously; the instance disappears from the dashboard once cleanup completes. Deletion is irreversible.What you can do: Wait. No operations are accepted.
API keys
API keys are used to authenticate your SDK with Synap Cloud. You can generate multiple keys per instance — one for each environment (production, staging, CI, etc.).Generating an API key
Click Generate API Key
In the API Keys section, click Generate API Key. Enter a label (e.g., “production”) to identify this key.
Revoking an API key
If an API key is compromised or no longer needed:- Navigate to the instance detail page.
- In the API Keys section, find the key by its label.
- Click Revoke.
401 Unauthorized on the next request.
Key rotation
To rotate an API key:- Generate a new key (give it a descriptive label like “production-v2”).
- Update your environment with the new key.
- Verify the new key works.
- Revoke the old key.
API routes
The following dashboard API routes are available for instance management:| Method | Route | Description |
|---|---|---|
GET | /dashboard/instances | List all instances (paginated) |
GET | /dashboard/instances/{instance_id} | Get instance details |
POST | /dashboard/instances | Create a new instance |
PATCH | /dashboard/instances/{instance_id} | Update instance metadata |
DELETE | /dashboard/instances/{instance_id} | Queue async instance deletion (client non-strict) |
POST | /dashboard/instances/{instance_id}/api-keys | Generate an API key |
GET | /dashboard/instances/{instance_id}/api-keys | List active API keys (masked) |
DELETE | /dashboard/instances/{instance_id}/api-keys/{credential_id} | Revoke a specific API key |
Next steps
Customized Memory Architectures
How Synap auto-generates the memory configuration for your Instance from your use-case file.
SDK Initialization
Connect your application to the instance using the API key.
Authentication Deep Dive
Understand the full zero-trust authentication model, API key management, and key rotation.
Monitoring & Analytics
Track your instance’s performance and usage after deployment.